Byjean

Types and Craftspersonship

Dabbling in personal identity proof

I knew it had been a while since I last posted to my blog, but 6 years, damn! Time sure flies !

As I followed the latest attempt at a twitter exodus to mastodon, I found myself immersed in a fresh timeline teeming with things I had somehow missed lately. One in particular caught my attention: decentralized identity proofs using keyoxide.

I got interested in identity proofs when I joined keybase. I eventually went all-in with a semi-paranoid GPG setup[1] :

  • Master key generated and manipulated on an airgapped older IME-less laptop, using tails linux, stored on an encrypted USB stick
  • Subkeys stored on yubikeys (3 actually : daily driver, cold spare for the daily driver, and an RFC enabled key for mobile usage)

But storing all my social network handles in my GPG key is painful, hence keyoxide !

The core idea is to verify claims of identity, the claims can be made using 2 protocols:

  • OpenPGP profiles notations with a proof@ariadne.id= prefix (the classic method)
  • Signature profiles : essentially text files with a gpg signature containing claims with a proof= prefix.

In both cases keyoxide will parse the prefixed information, try to determine a custom provider for the provided claim and verify that the proof actually exists. The proof consists in placing the gpg key fingerprint with an openpgp4fpr: prefix in a known location for the corresponding service.

Injecting the proof in GitHub requires creating a specific gist such as this, for Twitter you will have to post a tweet, for mastodon to add a metadata to your profile, for gitlab to create a project with a specific description, etc.

The claims must match the service’s verification provider expectations, and can be verified at https://keyoxide.org/sig by copy and pasting the signed claims.

This leaves the problem of distributing the signed claims. For now there is no obvious solution, I chose to add the file to the gist proof as that makes it easy to update for me and easy to reach for others.

[1] Maybe I’ll write about this someday but this is all pretty well documented already.
Git changelog

For a couple days I have needed to tell the team the changs contained in the last release of the backend code. Since each of our releases are tagged automatically thanks to our [painless-sbt-build] this is fairly straightforward. Today I automated a little bit more with 3 aliases added to my ~/.gitconfig :

  • git currrent-tag looks up the latest tag in the repository
  • git previous-tag looks up the tag immediately before the latest tag in the repository
  • git changelog displays only the changes between these two tags

The code for the aliases:

[alias]
current-tag= describe --abbrev=0 --tags
previous-tag= "!sh -c 'git describe --abbrev=0 --tags $(git current-tag)^'"
changelog = "!sh -c 'git --no-pager lg --first-parent $(git previous-tag)..$(git current-tag)'"

Painless release with SBT

As a developer, the only version which really matters is the SHA-1 of the commit from which a deployed artifact was built. It lets me quickly get the source code for this artifact back if a patch is needed. However as a project stakeholder, I need human understandable versions to provide to users. by human understandable I mean strictly increasing and possibly semantically versioned.

In this article I am going to detail an SBT combo allowing for SHA-1 based continuous delivery to an integration environment. The combo then allows to easily promote from this integration environment to QA, PreProd and Production platforms, creating a human understandable version in the process.

  • edit – Added missing bumper function for release version
  • edit – Bump sbt-git version, drop corresponding obsolete code (as it fixes #89 and #67)
  • edit – mention ExtraReleaseCommands.initialVcsChecksCommand based on a suggestion from the comment section

Improve your 'Test-First' experience with Intellij IDEA

I recently helped friends create a koans-based exercise to introduce people to CQRS and event sourcing1. I was tasked with creating the Java version of the exercise. Since the whole exercise was going to depend on the quality of the tests, we applied a test first approach.

I found it quite painful as I didn’t see an obvious way to actually create a test without already having the corresponding class. I was able to create an empty class but it would force me to write a lot of boiler plate manually (all the test annotations and all the static imports manually).

I happened to discuss this with Yann Cebron from Jetbrains at Devoxx France who showed me a neat trick using file templates2.

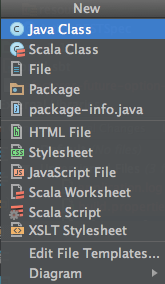
If you go to the project tool window, select a package in the test folder and try to create a new file with the default configuration, you should see something like this : a screen capture of the new file menu in Intellij

That’s a lot of templates and there is nothing to create a Junit4 test, lets create one.

Select edit file templates... and you will reach a window with a green + sign click that, name it Junit4 and paste the following code (or your own variation thereof) :

#if (${PACKAGE_NAME} && ${PACKAGE_NAME} != "")package ${PACKAGE_NAME};#end

import org.junit.Test;
import static org.junit.Assert.*;

public class ${NAME} {
  @Test
  public void test_${NAME}() throws Exception {

  }
}

Now save this and go back to the project tool window, select a package in the test folder and try to create a new file again. This time you should see the Junit4 template.

This is nice and nifty but it can still be improved : there is an Intellij action called from template (you can find it with find action... which is cmd+shift+a on mac)

Using this action only custom templates applicable will be displated, in a test directory for a mixed scala/java project it will show a much smaller menu making it even easier to create your test first.

a screen capture of the `from template` menu in Intellij

  1. You can find the exercise at http://github.com/devlyon/mixter. 

  2. This feature has been broken in a few Intellij builds and the user templates wouldn’t show up in the menu, see the corresponding issue on youtrack